You don't need OneNote, Omni Outliner, Ecco outliner or any other outliner software. You already have the outliner and note taking tool you need - MS Word. Discover it. Download an open-source outliner template for Word to add the functionalities that Word lacks.
Diesen Artikel gibt's auch auf
Deutsch
What is an
Outliner?
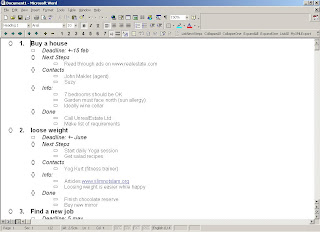
To me it's a Text Editor that allows you to organize ideas in a tree structure. You can use Notepad to create outlines: simply write up the main ideas, one on each line. If you have additional information for one main idea, then insert a new line beneath, press tab to indent the text in this line, and write up the sub-idea. And so forth. The picture shows an example.
Not all ideas can be organized in a tree structure, but you will be astonished how often it works, once you get warmed up.
At times, you might want to hide all the sub ideas and only see the main ideas. You cannot do that in Notepad, but you can do it in Word (I'll describe later how to do that).
When and idea belongs to more than one main idea, then you should organize the information in a table. That's the good thing about Word - you can insert tables in your outline, and you already know how to do it.
Computer scientists use a different variant of outlines to have computer systems communicate with each other, they use XML files. The rss feed of my blog is one example. If you open an xml file in Internet Explorer it will get displayed as an outline. So outlines are quite a modern concept.
A special case of outlines are mindmaps. When the whole Mind Mapping wave broke loose I was one of the first on board. I created lots of mindmaps until I realized that a PC screen was always too small for my mindmaps, let alone the screen of my Palm. That's when I became interested in outlines - the little brother of mindmaps. There are lots of special programs out there, but the easiest one is to use MS Word. (How to use Word's outline view - check
this or
this).
There are only some disadvantages:
- The font sizes decrease rapidly the more you indent an item.
- There is no feature to collapse or expand all items at once
To amend these drawbacks I created this
template. I have adapted the font sizes of the styles "Heading 1", "Heading 2" etc. so that the Outline looks nice. It also contains macros for collapse and expand.
I've already placed some example items in the template as an illustration.
Use the following keys:
TAB to demote an item
SHIFT TAB to promote an item
+ to expand an item
- to collapse an item
These key functions are already "built in" in MS Word.
The template recognizes the following additional key combinations (those are macros I added):
CTRL + to expand all items one more level
CTRL SHIFT + to expand all completely
CTRL - to collapse all one more level
CTRL SHIFT + to collapse all items completely
You can assign other key combinations to these macros if you want to:
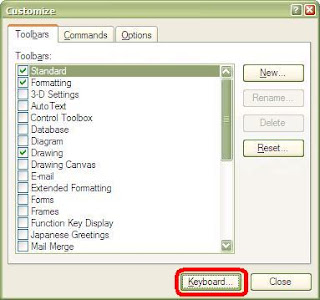

- In Word go to Tools/Customize
- Press the "Keyboard" button
- Under "Categories" choose "Macros"
- Under "Macros" choose the "CollapseAll" Macro
- Place the cursor in the field "Press new shortcut key"
- Simultaneously press the keys Ctrl, Shift and - (Minus)
- Press the "Assign" button
From now on, whenever you press the key combination Ctrl, Shift and -, the CollapseAll Macro will be called.
If you use the "Getting Things Done" methodology, then there's a little extra for you: the macro called "List Next Actions" extracts all subitems of items called "Next Actions". They are displayed in a Internet Explorer window, with buttons that allow you to create an Outlook appointment or task immediately.
For those who can't download Word templates here's the source code for the
Word Macros.


